Blackjackin with React Jay Esse
React JS Crash Course #
If you haven’t used React at all, you’re not in the right place.
If you have used React, but you’ve run into some confusing edges or are tired of the same meaningless tutorial examples, then you’re in the right place.

This guide is a fast paced tutorial but the annotated source code covers all the basic concepts as well as some of the confusing gotchas.
React is only the VIEW LAYER and that’s what we’ll cover with this article.
Make sure you got through the idea of Thinking in React, we’ll be building a Blackjack App completely operational but simplified for the sake of brevity.
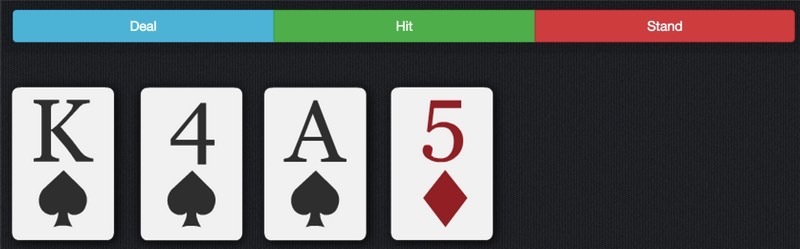
Demo of what we’ll end up.
Note: There’s code fragments sprinkled throughout this post. Before you proceed fork/download the source code for the final blackjack application, at our repository. The full annotated source include extra examples (Mixins, CSS in JSX, …) and stuff not called in the article.
React is a UI library developed to facilitate the creation of interactive, stateful & reusable UI components.
We love React because : #
- There really are only a few core concepts to learn.
- Works great for teams, strongly enforcing UI and workflow patterns
- UI code is readable and maintainable
- Componentized UI is the future of web development, and you need to start doing it now.
So, let’s get it started ! Our App will be able to spin multiple tables and each Table will have multiple Hands displaying stacks of Cards playing with the dealer Hand. For each table there is an Interface (deal/hit/stand) for each player and a component for the Outcome (score) of the playing hand.
Step 1: break the UI into a component hierarchy #
First of all it’s wise to follow the single responsibility principle and ideally, design your components to be responsible for only one thing. When you start to feel you are not doing it right anymore with your component, you should consider breaking it down into smaller ones.
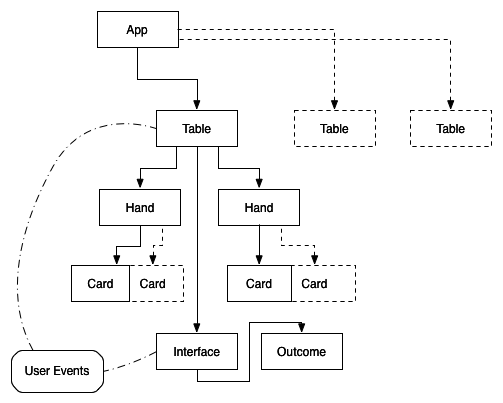
As you can see we can break our app into 5 components that represent each table in our app.
App: contains the entirety of the example and encompasses all the tables
Table: contains the dealer, the player hands, the playing interface and table outcome.
Hand: displays the hand stack of playing cards
Card: displays the image of the card
Interface: receives all the user input
Outcome: displays the table outcome
This is easy. Components that appear within another component in the graph should appear as a child in the hierarchy:
- App
- Table
- Hand
- Card
- Interface
- Outcome
- Hand
- Table
Great this is our mental data model ! We’ll now express it in React.
There are two types of “model” data in React: props and state. It’s important to understand the distinction between the two.
Step 2: Build a static version in React

Can you identify the components in this preview ? Of course you can.. let’s code them in react.
Make sure you understand the top-down flow order on the code below and let’s keep going since it outputs/renders nothing but inner structure.
/* Let's top down the beast */

var App = React.createClass({
 render: function() {
   return (
      <Table/>
    );
 }
});

/*******************************************************/

var Table = React.createClass({
render: function() {
  /* this render function can ONLY return ONE element, in this case we need to render a collection of elements so we have to encapsulate them in a div */
  return (
   <div>
      <Hand/>
      <Interface/>
      <Hand/>
   </div>
   );
}
});

/*******************************************************/

var Hand = React.createClass({
  render: function() {
    return (
      <div>
        <Card>
        <Card>
      </div>
      {/* this is how you comment inside the return function (jsx) */}
      );
  }
});

/*******************************************************/

var Card = React.createClass({
  render: function() {
     /*this div will soon represent the card image, hang tight*/
     return (
       <div/>
      );
 }
});

/*******************************************************/

var Interface = React.createClass({
 render: function() {
   /* wow what a party of mixed elements (all inside a div because as you already know we can only return ONE main element */
   return (
     <div>
         {/* This will render the Outcome element */}
        <Outcome/>
         {/* but the following code is owned by Interface */}
        <div >
          <a>Dealer Score : </a>
          <a>Player Score : </a>
        </div>
        <button >Deal</button>
        <button>Hit</button>
        <button >Stand</button>
     </div>
     );
 }
});

/*******************************************************/

var Outcome = React.createClass({
 render: function() {
     /* simple stuff */
     return(
        <div>Click Deal to Start ! </div>
      );
 }
});

/*******************************************************/

React.render(<App/>,document.getElementById('container'));
Now that we have our component hierarchy it’s time to start implementing the UI. If you’re familiar with the concept of state, don’t use state at all to build this static version. State is reserved only for interactivity, that is, data that changes over time. Since this is a static version of the app you don’t need it now.
You can build top-down or bottom-up. That is, you can either start with building the components higher up in the hierarchy (i.e. starting with Table) or with the ones lower in it (Card). In simpler examples it’s usually easier to go top-down and on larger projects it’s easier to go bottom-up and write tests as you build.
Can you implement a static version of the game Table using props resembling the picture on top of the section ?

Okay okay, just download/fork the complete version of the app (if you haven’t already) and continue to follow the article.
Step 3: Identify the minimal (but complete) representation of UI state
To make your UI interactive you need to be able to trigger changes to your underlying data model. This means we should deal new cards, hands should update, cards must display the correct data , outcome should show the game status and the interface should trigger all these changes. React makes this easy with state.
The key here is DRY: Don’t Repeat Yourself. Figure out what the absolute minimal representation of the state that our blackjack table needs to have and compute everything else you need on-demand.
Let’s picture the data flow and understand this DRY software paradigm in our models.

For example, at our BlackJack Table we’ll have a complete deck of cards, and each Hand we’ll be provided with some Cards which will be computed into player score in the Interface component and so on.
All the pieces of data we have:
- A deck of Cards
- Dealt Cards to each hand
- Card Info ( what image to display )
- Player Score ( dealer included )
- Game status ( player bust / dealer bust / playing / .. )
Let’s go through each one and figure out which one is state. Simply ask three questions about each piece of data:
- Is it passed in from a parent via props? If so, it probably isn’t state.
- Does it change over time? If not, it probably isn’t state.
- Can you compute it based on any other state or props in your component? If so, it’s not state.
So finally, our state is:
- Deck of Cards on the Table
- Dealt Cards for each Hand
Score can be computed based on the player hands, card info is passed from the Hand parent and game status can also be inferred from player score.
Step 4: Identify where your state should live
I’m sure you got it already.
Remember: React is all about one-way data flow down the component hierarchy.
Table is dealt with a shuffled deck and needs to deal the cards to the player Hands. As for the Hands the common owner is the Table that stores the state of the Hands dealt. The Hand just render the Cards, it’s a dumb component down to the bottom. The Interface receives computed scores and the means to interact with the player.

We don’t need to get up to the App component to get a new deck. Table component can reshuffle the initial deck it received from its parent (App) and deal new Cards.
As for the interactivity part the Table will contain the logic and provide the Interface with the functions to deal with it (inverse data-flow)
Great, state should live in the Table component.
Let’s get our hands on the code.
Step 5: Add inverse data flow

When user clicks in the HIT button we are going to setState() at Table level and the changes (in blue) propagate down the hierarchy.
We created the following game logic functions :
- handScore
- handleDealButton
- handleHitButton
- handleStandButton
The first is used by the component to compute the Hand score based on the provided Cards. The following 3 handle functions are served to the Interface component so the user can perform those actions by triggering this events on the interface.
handleHitButton : function(){

    //check deck size
    if(this.state.deck.length < 5){
        this.state.deck = _.shuffle(this.props.deck);
    }

    // we shuffle every time so you dont cheat by checking component state :D
    var shuffled = _.shuffle(this.state.deck);

    // deal a card
    this.state.player.push(shuffled.pop());

    // compute hand score
    this.state.playerscore = this.handScore(this.state.player);

    // compute game status
    if(this.state.playerscore < 21 && this.state.player.length == 5){
      // five card charlie
      this.state.status = "win";
    }
    if(this.state.playerscore >21){
        this.state.status = "lose";
    }

    // update state accordingly
    this.setState({
        player :  this.state.player,
        deck : shuffled,
        status : this.state.status
    });

},
In order to understand how to provide the means for one component to update state in parent components take a glance at the Table component.
And that’s it.. Hit ME !
While it may be a little more typing than you’re used to, remember that code is read far more than it’s written, and it’s extremely easy to read this modular, explicit code. As you start to build large libraries of components you’ll appreciate this explicitness and modularity, and with code reuse your lines of code will start to shrink !
This blackjack app was coded in less than an hour from drawing paper to completion.
Hope you find this article and the source useful for your path in React.
Fork our simple version of the application and send some pull requests with your optimisations.
Next iteration of this article will include:
- code review optimisations
- multiple players at the table using React refs
- Websocket implementation for mano-a-mano blackjackin
- Betting some moneys
- Double-downs and Splits
- Bundling with Webpack and Babel
☵☲ Buy me a beer ☵☲ hkd up by Flávio HG
THE BEER-WARE LICENSE (Revision 42)
As long as you retain this notice you can do whatever you want with this stuff. If we meet some day, and you think this stuff is worth it, you can buy me a beer in return.